If you’re looking for a vibrant, satisfying dish that combines the smoky charm of grilled cheese with fresh, colorful vegetables, this Grilled Halloumi and Vegetable Skewers Salad is exactly what you need. Perfect for warm evenings or a light yet hearty lunch, this recipe brings together the unique texture of halloumi cheese with the natural sweetness of grilled vegetables, all tossed on a bed of crisp mixed greens and finished with a tangy balsamic vinaigrette. It’s a feast for the eyes and the palate, offering a delightful balance of flavors and textures that will have you coming back for more.
Why This Recipe Is a Must-Try
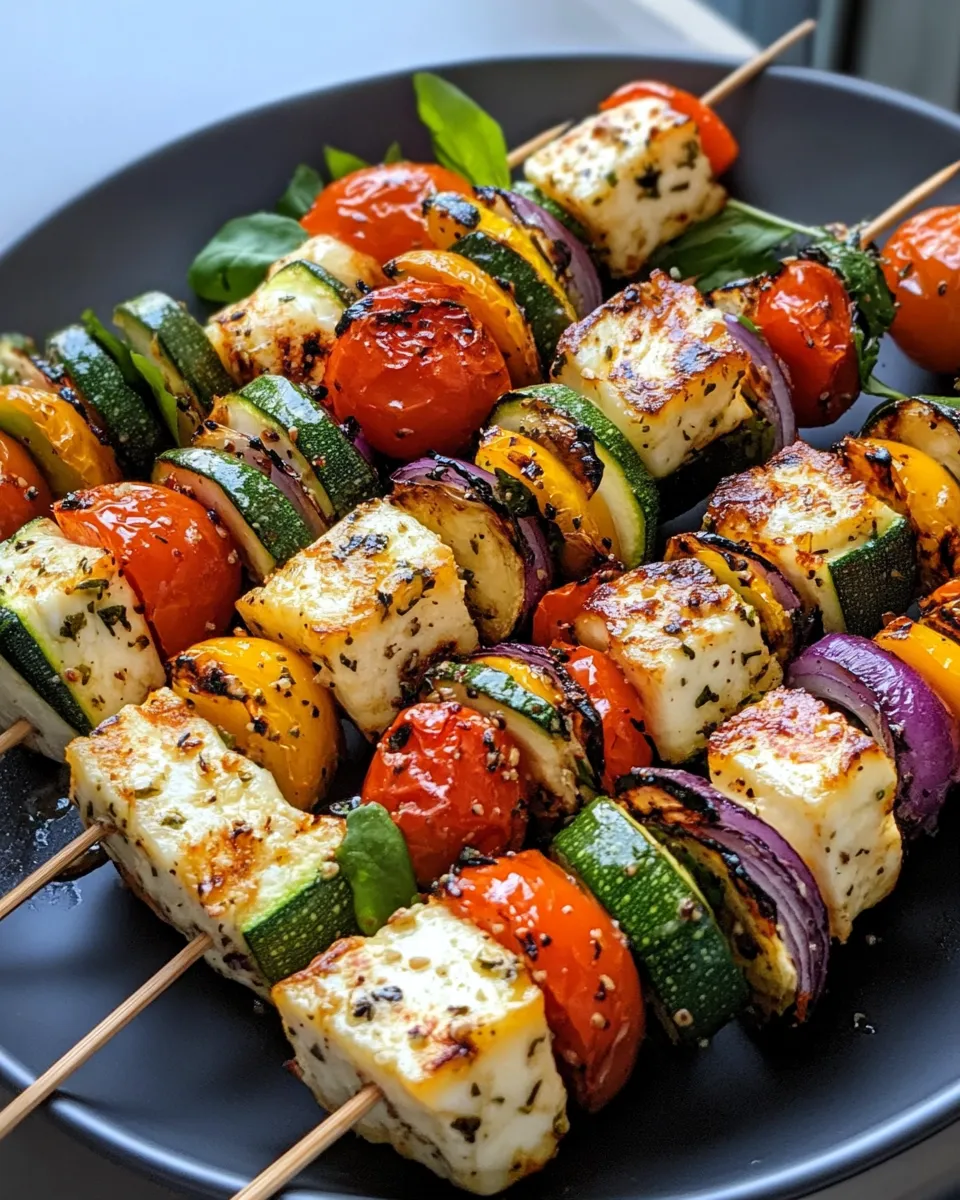
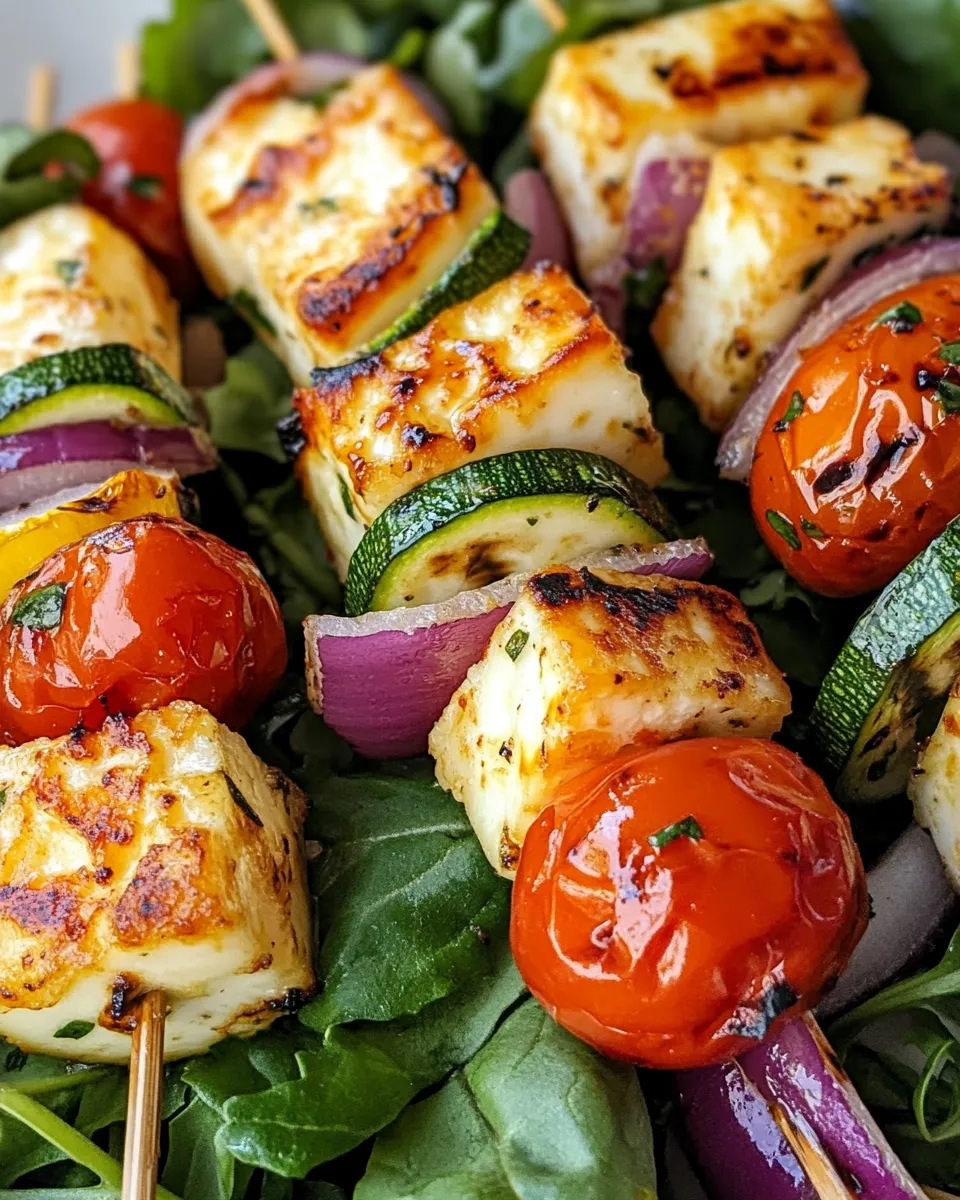
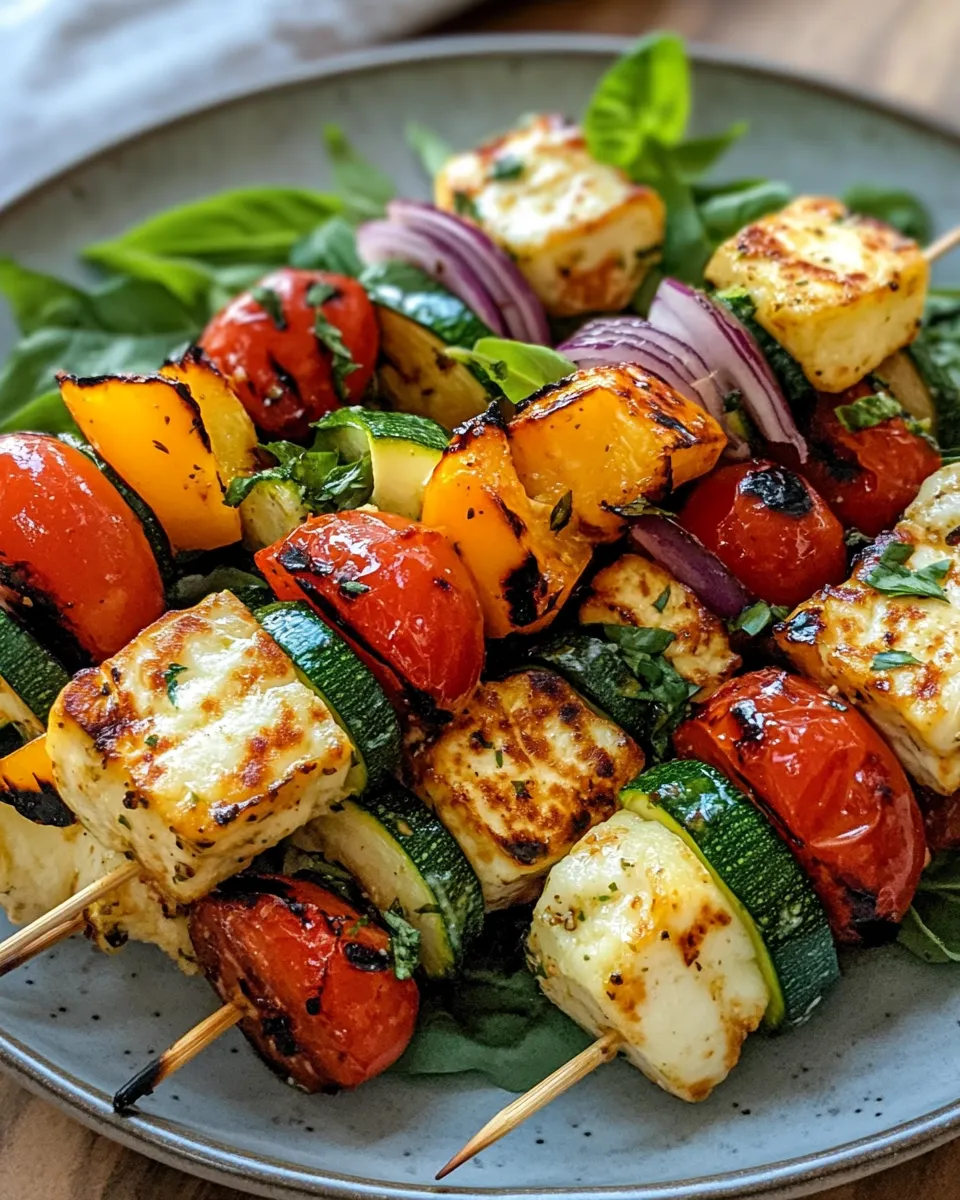
This Grilled Halloumi and Vegetable Skewers Salad stands out for several reasons. First, halloumi cheese is a game-changer when it comes to grilling. Unlike many cheeses, it holds its shape and develops a beautiful golden crust without melting away, providing a delightful chewy texture and a hint of saltiness. Pair that with a colorful medley of zucchini, bell pepper, red onion, and cherry tomatoes, all lightly seasoned and grilled to perfection, and you’ve got a dish bursting with fresh, smoky flavor.
Moreover, the salad is incredibly versatile and quick to prepare, making it ideal for both weeknight dinners and weekend gatherings. The ingredients are simple, wholesome, and easy to find, yet the result feels special and restaurant-worthy. The balsamic vinaigrette adds a zesty acidity that perfectly balances the richness of the halloumi and the sweet, caramelized veggies, creating a harmonious taste experience. Whether you’re vegetarian or just looking to add more plant-based meals to your rotation, this salad is a delicious, nutritious option that satisfies every craving.
Ingredients
- 1 block of halloumi cheese, cut into cubes
- 1 zucchini, sliced into half-moons
- 1 bell pepper, cut into squares
- 1 red onion, cut into wedges
- 1 cup cherry tomatoes, halved
- 2 tablespoons olive oil
- 1 teaspoon dried oregano
- Salt and pepper to taste
- Mixed greens for serving
- Balsamic vinaigrette for drizzling
How To Make Grilled Halloumi and Vegetable Skewers Salad
Step 1: Prepare the Ingredients
Start by cutting your halloumi cheese into cubes, about one-inch pieces work best for even grilling. Next, slice the zucchini into half-moons, chop the bell pepper into squares, and wedge the red onion. Halve the cherry tomatoes so they cook evenly and release their natural sweetness on the grill.
Step 2: Season the Vegetables and Halloumi
In a large bowl, combine the zucchini, bell pepper, red onion, and cherry tomatoes. Drizzle with olive oil, sprinkle the dried oregano, and season with salt and pepper to your liking. Toss everything together gently to ensure each piece is well-coated. Do the same for the halloumi cubes separately, but be careful not to overcrowd them to maintain their texture.
Step 3: Assemble the Skewers
Thread the halloumi cubes and vegetables alternately onto skewers. Aim for a colorful pattern, combining different vegetables with the cheese to ensure each bite is balanced and appealing.
Step 4: Grill the Skewers
Preheat your grill or grill pan to medium-high heat. Place the skewers on the grill and cook for about 3-4 minutes per side. Watch carefully as halloumi browns quickly and vegetables should develop nice grill marks while softening slightly. Rotate the skewers to get an even char without burning.
Step 5: Prepare the Salad Base
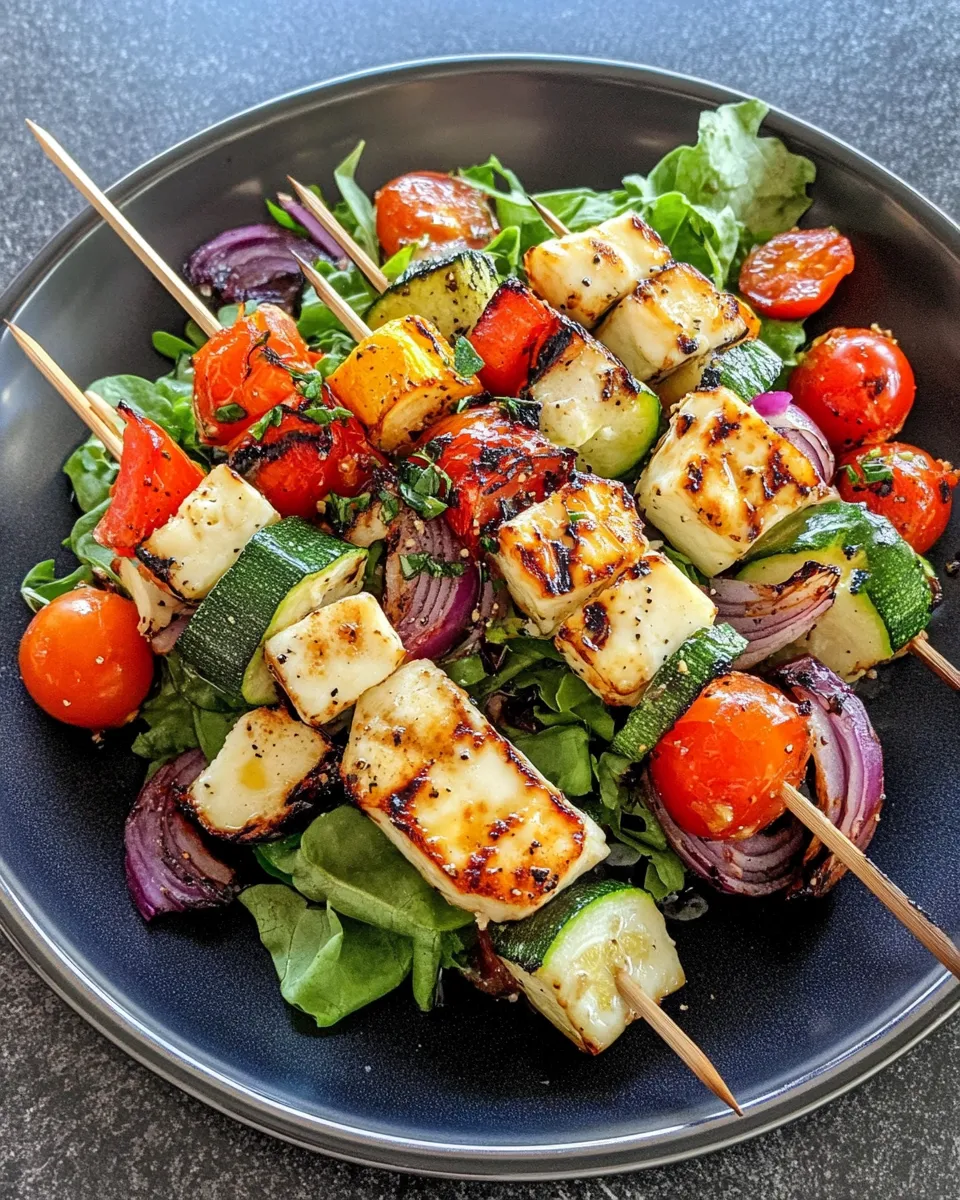
While the skewers are grilling, arrange a bed of mixed greens on a large serving platter or individual plates. The greens add freshness and a lovely contrast in texture to the warm, grilled ingredients.
Step 6: Assemble and Serve
Once the skewers are cooked, carefully remove the halloumi and grilled vegetables from the skewers and distribute them evenly over the mixed greens. Drizzle with balsamic vinaigrette to taste, adding just the right amount of tang and sweetness. Serve immediately and enjoy the beautiful medley of flavors.
Expert Tips
- Soak wooden skewers in water for 30 minutes before grilling to prevent burning.
- Halloumi grills best when it’s dry, so pat it with a paper towel before seasoning and skewering.
- Use a grill pan indoors if the weather doesn’t cooperate; it will still give those lovely grill marks and flavor.
- Don’t overcrowd the grill or skewers to ensure even cooking and a nice char on each piece.
- Feel free to add a squeeze of fresh lemon juice over the finished salad for an extra burst of brightness.
Variations and Customizations
- Swap out vegetables depending on the season – asparagus, mushrooms, or eggplant work beautifully.
- Add fresh herbs such as basil, mint, or parsley for an herby twist.
- Include some toasted pine nuts or walnuts on top for added crunch and nutty flavor.
- Use a different cheese like paneer if you want a similar grilling effect with a different taste.
- For a heartier salad, toss in cooked quinoa or couscous before serving.
Dietary Adaptations
This Grilled Halloumi and Vegetable Skewers Salad is naturally vegetarian and gluten-free, making it suitable for a variety of dietary preferences. To make it vegan, replace halloumi with a plant-based cheese alternative that grills well or use firm tofu marinated in lemon and herbs. For a lower-fat option, reduce the amount of olive oil used for tossing the vegetables and opt for a light balsamic vinaigrette or lemon juice dressing without added oils.
How to Store Leftovers
If you have leftovers of this Grilled Halloumi and Vegetable Skewers Salad, store the grilled vegetables and halloumi cubes separately from the greens and dressing in airtight containers. Keep them refrigerated for up to 2 days. When ready to eat, reheat the halloumi and vegetables gently in a skillet or oven to regain their grilled texture, then toss with fresh greens and dressing for a quick, fresh meal.
FAQ
Can I make this recipe without a grill?
Absolutely! You can use a grill pan on your stovetop or even roast the vegetables and halloumi in the oven at 400°F (200°C) on a baking sheet. Broiling for a few minutes is another option to achieve that charred flavor.
Is halloumi salty? Should I soak it before grilling?
Halloumi does have a naturally salty flavor, but it varies by brand. If you find it too salty, soaking the cheese in water for 30 minutes can reduce the saltiness. Just be sure to pat it dry before grilling.
Can I prepare the skewers ahead of time?
You can assemble the skewers a few hours in advance and keep them covered in the refrigerator. However, it’s best to grill them fresh to maintain the best texture and flavor.
What can I use instead of balsamic vinaigrette?
Lemon juice mixed with olive oil and a pinch of salt makes a simple, fresh dressing that complements the grilled flavors nicely. You can also try a tahini-based dressing or a yogurt herb sauce for a creamy alternative.
Conclusion
This Grilled Halloumi and Vegetable Skewers Salad is a delightful dish that brings together the best of summer grilling and fresh salad flavors. It’s easy to prepare, visually stunning, and packed with flavor—making it a perfect addition to your meal rotation. Whether you’re entertaining guests or simply enjoying a wholesome meal at home, this recipe promises a satisfying experience with every bite. So fire up the grill, gather your ingredients, and treat yourself to this vibrant, tasty salad that celebrates the beauty of simple, fresh ingredients.
Share on Pinterest


Grilled Halloumi and Vegetable Skewers Salad
Ingredients
- 1 block halloumi cheese cut into cubes
- 1 zucchini sliced into half-moons
- 1 bell pepper cut into squares
- 1 red onion cut into wedges
- 1 cup cherry tomatoes halved
- 2 tablespoons olive oil
- 1 teaspoon dried oregano
- salt and pepper to taste
- mixed greens for serving
- balsamic vinaigrette for drizzling
Instructions
Step 1: Prepare the Ingredients
- Cut halloumi cheese into cubes about one-inch pieces. Slice zucchini into half-moons, chop bell pepper into squares, wedge red onion, and halve cherry tomatoes.
Step 2: Season the Vegetables and Halloumi
- In a large bowl, combine zucchini, bell pepper, red onion, and cherry tomatoes. Drizzle with olive oil, sprinkle dried oregano, and season with salt and pepper. Toss gently to coat. Separately, season halloumi cubes without overcrowding.
Step 3: Assemble the Skewers
- Thread halloumi cubes and vegetables alternately onto skewers, aiming for a colorful pattern.
Step 4: Grill the Skewers
- Preheat grill or grill pan to medium-high heat. Grill skewers 3-4 minutes per side until halloumi is golden and vegetables have grill marks. Rotate for even cooking without burning.
Step 5: Prepare the Salad Base
- Arrange a bed of mixed greens on a large serving platter or individual plates.
Step 6: Assemble and Serve
- Remove halloumi and grilled vegetables from skewers and distribute over mixed greens. Drizzle with balsamic vinaigrette to taste and serve immediately.
Equipment
- Grill or Grill Pan
- Large bowl
- Skewers
- Serving Platter
Notes
- Soak wooden skewers in water for 30 minutes before grilling to prevent burning.
- Pat halloumi dry before grilling to achieve the best crust.
- Use a grill pan indoors if outdoor grilling isn’t possible.
- Don’t overcrowd skewers to ensure even cooking and char.
- Add a squeeze of fresh lemon juice over the finished salad for extra brightness.